HTML Tutorial
HTML tutorial or HTML 5 tutorial provides basic and advanced concepts of HTML. Our HTML tutorial is developed for beginners and professionals. In our tutorial, every topic is given step-by-step so that you can learn it in a very easy way. If you are new in learning HTML, then you can learn HTML from basic to a professional level and after learning HTML with CSS and JavaScript you will be able to create your own interactive and dynamic website. But Now We will focus on HTML only in this tutorial.
The major points of HTML are given below:
- HTML stands for HyperText Markup Language.
- HTML is used to create web pages and web applications.
- HTML is widely used language on the web.
- We can create a static website by HTML only.
- Technically, HTML is a Markup language rather than a programming language.
HTML Example with HTML Editor
In this tutorial, you will get a lot of HTML examples, at least one example for each topic with explanation. You can also edit and run these examples, with our online HTML editor. Learning HTML is fun, and it’s very easy to learn.
Example
- <!DOCTYPE html>
- <html>
- <head>
- <title>Web page title</title>
- </head>
- <body>
- <h1>Write Your First Heading</h1>
- <p>Write Your First Paragraph.</p>
- </body>
- </html>
Description of HTML Example
<!DOCTYPE>: It defines the document type or it instruct the browser about the version of HTML.
<html > :This tag informs the browser that it is an HTML document. Text between html tag describes the web document. It is a container for all other elements of HTML except <!DOCTYPE>
<head>: It should be the first element inside the <html> element, which contains the metadata(information about the document). It must be closed before the body tag opens.
<title>: As its name suggested, it is used to add title of that HTML page which appears at the top of the browser window. It must be placed inside the head tag and should close immediately. (Optional)
<body> : Text between body tag describes the body content of the page that is visible to the end user. This tag contains the main content of the HTML document.
<h1> : Text between <h1> tag describes the first level heading of the webpage.
<p> : Text between <p> tag describes the paragraph of the webpage.
Brief History of HTML
In the late 1980’s , a physicist, Tim Berners-Lee who was a contractor at CERN, proposed a system for CERN researchers. In 1989, he wrote a memo proposing an internet based hypertext system.
Tim Berners-Lee is known as the father of HTML. The first available description of HTML was a document called “HTML Tags” proposed by Tim in late 1991. The latest version of HTML is HTML5, which we will learn later in this tutorial.
HTML Versions
Since the time HTML was invented there are lots of HTML versions in market, the brief introduction about the HTML version is given below:
HTML 1.0: The first version of HTML was 1.0, which was the barebones version of HTML language, and it was released in1991.
HTML 2.0: This was the next version which was released in 1995, and it was standard language version for website design. HTML 2.0 was able to support extra features such as form-based file upload, form elements such as text box, option button, etc.
HTML 3.2: HTML 3.2 version was published by W3C in early 1997. This version was capable of creating tables and providing support for extra options for form elements. It can also support a web page with complex mathematical equations. It became an official standard for any browser till January 1997. Today it is practically supported by most of the browsers.
HTML 4.01: HTML 4.01 version was released on December 1999, and it is a very stable version of HTML language. This version is the current official standard, and it provides added support for stylesheets (CSS) and scripting ability for various multimedia elements.
HTML5 : HTML5 is the newest version of HyperText Markup language. The first draft of this version was announced in January 2008. There are two major organizations one is W3C (World Wide Web Consortium), and another one is WHATWG( Web Hypertext Application Technology Working Group) which are involved in the development of HTML 5 version, and still, it is under development.
Features of HTML
1) It is a very easy and simple language. It can be easily understood and modified.
2) It is very easy to make an effective presentation with HTML because it has a lot of formatting tags.
3) It is a markup language, so it provides a flexible way to design web pages along with the text.
4) It facilitates programmers to add a link on the web pages (by html anchor tag), so it enhances the interest of browsing of the user.
5) It is platform-independent because it can be displayed on any platform like Windows, Linux, and Macintosh, etc.
6) It facilitates the programmer to add Graphics, Videos, and Sound to the web pages which makes it more attractive and interactive.
7) HTML is a case-insensitive language, which means we can use tags either in lower-case or upper-case.
NOTE: It is recommended to write all tags in lower-case for consistency, readability, etc.
HTML text Editors
- An HTML file is a text file, so to create an HTML file we can use any text editors.
- Text editors are the programs which allow editing in a written text, hence to create a web page we need to write our code in some text editor.
- There are various types of text editors available which you can directly download, but for a beginner, the best text editor is Notepad (Windows) or TextEdit (Mac).
- After learning the basics, you can easily use other professional text editors which are, Notepad++, Sublime Text, Vim, etc.
- In our tutorial, we will use Notepad and sublime text editor. Following are some easy ways to create your first web page with Notepad, and sublime text.
A. HTML code with Notepad. (Recommended for Beginners)
Notepad is a simple text editor and suitable for beginners to learn HTML. It is available in all versions of Windows, from where you easily access it.
Step 1: Open Notepad (Windows)

Step 2: Write code in HTML

Step 3: Save the HTML file with .htm or .html extension.

Step 4: Open the HTML page in your web browser.
To run the HTML page, you need to open the file location, where you have saved the file and then either double-click on file or click on open with option


B. HTML code with Sublime Text-editor.(Recommended after learning basics of HTML)
When you will learn the basics of HTML, then you can use some professional text editors, which will help you to write an efficient and fast code. So to use Sublime Text editors, first it needs to download and install from internet. You can easily download it from this https://www.sublimetext.com/download link and can install in your PC. When installation of Sublime text editor done then you can follow the simple steps to use it:
Step 1: Open Sublime Text editor(Windows 8):
To open Sublime Text editor go to Start screen ⤏ type Sublime Text⤏ Open it. To open a new page press CTRL+N.

Step 2: Save the page before writing any code.
To save your page in Sublime Text press Ctrl+S or go to File option ⤏ save, to save a file use extension .htm or .html. We recommend to save the file first then write the code because after saving the page sublime text editor will give you suggestions to write code.

Step 3: Write the code in Sublime Text editor

Step 4: Open the HTML page in your Browser
To execute or open this page in Web browser just right click by mouse on sublime text page and click on Open in Browser.


Note: You can execute HTML file in any browser, but there are some tags which are not supported by Some Web browser.
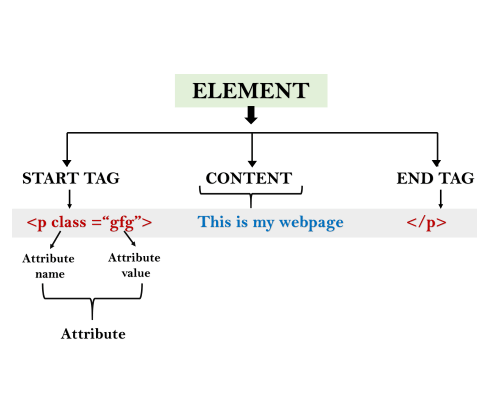
Building blocks of HTML
An HTML document consist of its basic building blocks which are:
- Tags: An HTML tag surrounds the content and apply meaning to it. It is written between < and > brackets.
- Attribute: An attribute in HTML provides extra information about the element, and it is applied within the start tag. An HTML attribute contains two fields: name & value.
Syntax
- <tag name attribute_name= ” attr_value”> content </ tag name>
- Elements: An HTML element is an individual component of an HTML file. In an HTML file, everything written within tags are termed as HTML elements.
Example
- <!DOCTYPE html>
- <html>
- <head>
- <title>The basic building blocks of HTML</title>
- </head>
- <body>
- <h2>The building blocks</h2>
- <p>This is a paragraph tag</p>
- <p style=“color: red”>The style is attribute of paragraph tag</p>
- <span>The element contains tag, attribute and content</span>
- </body>
- </html>
HTML Tags
HTML tags are like keywords which defines that how web browser will format and display the content. With the help of tags, a web browser can distinguish between an HTML content and a simple content. HTML tags contain three main parts: opening tag, content and closing tag. But some HTML tags are unclosed tags.
When a web browser reads an HTML document, browser reads it from top to bottom and left to right. HTML tags are used to create HTML documents and render their properties. Each HTML tags have different properties.
An HTML file must have some essential tags so that web browser can differentiate between a simple text and HTML text. You can use as many tags you want as per your code requirement.
- All HTML tags must enclosed within < > these brackets.
- Every tag in HTML perform different tasks.
- If you have used an open tag <tag>, then you must use a close tag </tag> (except some tags)
Syntax
<tag> content </tag>
HTML Tag Examples
Note: HTML Tags are always written in lowercase letters. The basic HTML tags are given below:
<p> Paragraph Tag </p>
<h2> Heading Tag </h2>
<b>Bold Tag</b>
<i>Italic Tag</i>
<u> Underline Tag</u>
Unclosed HTML Tags
Some HTML tags are not closed, for example br and hr.
<br> Tag: br stands for break line, it breaks the line of the code.
<hr> Tag: hr stands for Horizontal Rule. This tag is used to put a line across the webpage.
HTML Meta Tags
DOCTYPE, title, link, meta and style
HTML Text Tags
<p>, <h1>, <h2>, <h3>, <h4>, <h5>, <h6>, <strong>, <em>, <abbr>, <acronym>, <address>, <bdo>, <blockquote>, <cite>, <q>, <code>, <ins>, <del>, <dfn>, <kbd>, <pre>, <samp>, <var> and <br>
HTML Link Tags
<a> and <base>
HTML Image and Object Tags
<img>, <area>, <map>, <param> and <object>
HTML List Tags
<ul>, <ol>, <li>, <dl>, <dt> and <dd>
HTML Table Tags
table, tr, td, th, tbody, thead, tfoot, col, colgroup and caption
HTML Form Tags
form, input, textarea, select, option, optgroup, button, label, fieldset and legend
HTML Scripting Tags
script and noscript
Note: We will see examples using these tags in later charters.
All HTML Tags
Let’s discuss the complete tag list that is present in the HTML that is represented below.
1. Comments:
With the help of this tag, we can add comments in the HTML. After commenting on the elements, the browser does not render it. Also, these comments parts are not displayed on the web page. But these commented codes are available in the source code.
Syntax:
- <strong><!– –></strong>
2. Doctype:
With the help of this tag, we can declare the version of the markup language to the web browser.
Syntax:
- < !DOCTYPE html >
3. <a>:
With the help of this tag, we can create a hyperlink to the web page. The hyperlink can be done with the help of another file in a different location.
Syntax:
- <a href=“url”>Link Text</a>
4. <abbr>:
With the help of this tag, we can define the abbreviations or acronyms of longer words, such as www, HTML, HTTP, etc.
Syntax:
- <abbr title=“expanded-text”>abbreviation</abbr>
5. <address>:
With the help of this tag, we can find the address or the contact details of the web page’s author. The <address> tag contains addresses, cellphone numbers, emails, website connections, etc.
Syntax:
- <address>
- Contact Information Goes Here
- </address>
6. <area>:
With the help of this tag, we can identify the clickable area associated with the hyperlink.
Syntax:
- <area shape=“shape-type” coords=“coordinates” href=“destination-url” alt=“alternative-text”>
7. <article>:
With the help of this tag, we can represent a piece of content that is used to be distributed to other websites without being a part of this. With the help of <article> tag, we can display entire blog posts, news articles, or similar content, etc.
Syntax:
- <article>
- <!– Content goes here –>
- </article>
8. <audio>:
With the help of this tag, we can embed the audio file into the webpage. To do this, there is no need for additional plug-ins like Flash.
Syntax:
- <audio src=“audio-file.mp3” controls>
- Your browser does not support the audio element.
- </audio>
9. <aside>:
With the help of this tag, we can define the content related to the web page’s main content, but they are not constituted to the web page.
Syntax:
- <aside>
- <!– Content goes here –>
- </aside>
10. <b>:
With the help of this tag, we can make the text bold without any additional significance.
Syntax:
- <b>Text to be displayed in bold</b>
11. <base>:
With the help of this tag, we can create the target address, which is targeted by all the URLs present in the document.
Syntax:
- <base href=“base-url” target=“base-target”>
12. <bdi>:
With the help of this tag, we can tell the browser to isolate the text that comes from other destinations with the help of a bidirectional algorithm.
Syntax:
- <bdi>Text with different directionality</bdi>
13. <bdo>:
With the help of this tag, we can override the current text.
Syntax:
- <bdo dir=“direction”>Text with overridden directionality</bdo>
14. <blockquote>:
With the help of this tag, we can provide a way to insert the quotation in the document from another source. By default, the browser takes the text inside a quote tag as indented.
Syntax:
- <blockquote>
- Quoted content goes here.
- </blockquote>
15. <body>:
With the help of this tag, we can define the web page’s main content. The body tag includes text, paragraphs, headings, images, tables, links, and videos.
Syntax:
- <body>
- <!– Content goes here –>
- </body>
- <strong> </strong>
16. <br>:
With the help of this tag, we can produce a line break on the web page. We can use this tag basically during the writing of poems or addresses that require line breaks.
Syntax:
- <br>
- <strong> </strong>
17. <button>:
With the help of this tag, we can create a clickable button on the web page. We can use the button tag in forms or anywhere in a document.
Syntax:
- <button>Button Text</button>
- <strong> </strong>
18. <canvas>:
With the help of this tag, we can define a particular region used for drawing graphics through scripting (usually JavaScript).
Syntax:
- <canvas id=“canvas-id” width=“width” height=“height”></canvas>
19. <caption>:
With the help of this tag, we can create the table caption, which is used to create the title for the table.
Syntax:
- <table>
- <caption>Caption Text</caption>
- <!– Table content goes here –>
- </table>
20. <cite>:
With the help of this tag, we can do some creative work and give a title for that creative work.
Syntax:
- <cite>Referenced Content</cite>
21. <code>:
With the help of this tag, we can insert a particular code fragment, which might be HTML or CSS code.
Syntax:
- <code>Code goes here</code>
22. <col>:
With the help of this tag, we can specify all the column’s properties. We can specify it inside the <colgroup> element.
Syntax:
- <col>
23. <colgroup>:
With the help of this tag, we can specify one or more columns in a group. With the help of this, we can apply the style to the entire column without repeating the style for every column and every row.
Syntax:
- <colgroup>
- <!– col elements go here –>
- </colgroup>
24. <data>:
With the help of this tag, we can add machine-readable translation. The processor generates it, and the browser can generate the human-readable value.
Syntax:
- <data value=“data-value”>Data Label</data>
25. <datalist>:
With the help of this tag, we can provide an auto-complete feature to the form element. With the help of this, the user can select the option from the option list.
Syntax:
- <input list=“datalist-id”>
- <datalist id=“datalist-id”>
- <!– option elements go here –>
- </datalist>
26. <dd>:
With the help of this tag, we can define the definition description in the HTML. It is also used to describe an item in the list of descriptions.
Syntax:
- <dl>
- <dt>Term</dt>
- <dd>Description or definition goes here</dd>
- </dl>
27. <del>:
With the help of this tag, we can declare the particular section that will be deleted from the document. After doing this, the web browser strike over that particular section in the webpage.
Syntax:
- <del>Deleted Text</del>
28. <details>:
With the help of this tag, we can create a toggle. This toggle contains all the information but is in a closed state. When we mouse hover over it, it comes to an open state and displays all the hidden information.
Syntax:
- <details>
- <summary>Summary Text</summary>
- <!– Content goes here –>
- </details>
29. <dfn>:
With the help of this tag, we can represent the definition element. With the help of the definition element, we can define the instances of the definition. When a term first appears in the document, it is known as the instances of the definition.
Syntax:
- <dfn>Term Definition</dfn>
30. <dialog>:
With the help of this tag, we can define a dialogue box and the other webpage components. With the help of this component, the webpage can interact with the user beautifully.
Syntax:
- <dialog open>
- <!– Dialog content goes here –>
- </dialog>
31. <div>:
With the help of this tag, we can create a generic container that can hold the flow of the content. It also does not have the default rendering.
Syntax:
- <div>
- <!– Content goes here –>
- </div>
32. <dl>:
With the help of this tag, we can define the list of items on the web page. We can also represent the metadata with the help of this tag.
Syntax:
- <dl>
- <dt>Term 1</dt>
- <dd>Definition 1</dd>
- <dt>Term 2</dt>
- <dd>Definition 2</dd>
- <!– more terms and definitions –>
- </dl>
33. <dt>:
With the help of this tag, we can define the definition list on the web page. we have to write the <dt> tag within the <dl> tag. We can also flow this element with the help of <dd> tag.
Syntax:
- <dl>
- <dt>Term</dt>
- <!– Definition or description goes here –>
- </dl>
34. <em>:
With the help of this tag, we can emphasize a particular word or phrase within a sentence. It converts the normal word or sentence into italic and semantic styles.
Syntax:
- <em>Emphasized Text</em>
35. <embed>:
With the help of this tag, we can embed external things such as audio or video into the webpage.
Syntax:
- <embed src=“content-url”>
36. <fieldset>:
With the help of this tag, we can create a group of related elements inside a form. Also, with the help of this, we can create a box around the element.
Syntax:
- <fieldset>
- <legend>Fieldset Title</legend>
- <!– Form controls go here –>
- </fieldset>
37. <figcaption>:
With the help of this tag, we can attach the caption for the image, table, or chart contained within the <figure> element.
Syntax:
- <figure>
- <!– Content goes here –>
- <figcaption>Caption or Description</figcaption>
- </figure>
38. <figure>:
With the help of this tag, we can create self-contained content, also referred to as a single entity.
Syntax:
- <figure>
- <!– Content goes here –>
- <figcaption>Caption or Description</figcaption>
- </figure>
39. <footer>:
With the help of this element, we can represent the footer part in the root element.
Syntax:
- <footer>
- <!– Footer content goes here –>
- </footer>
40. <form>:
With the help of this tag, we can receive the information from the user.
Syntax:
- <form action=“form-handler-url” method=“HTTP-method”>
- <!– Form controls go here –>
- </form>
41. <head>:
With the help of this tag, we can specify the header part of the header section of the code. It contains all the information regarding the document.
Syntax:
- <head>
- <!– Head content goes here –>
- </head>
42. <header>:
With the help of this tag, we can define the webpage’s header. It also contains information regarding the title and heading of the document and section.
Syntax:
- <header>
- <!– Header content goes here –>
- </header>
43. <hgroup>:
With the help of this tag, we can represent the heading group. It is also used for group heading elements, such as headings and subheadings, from <h1> to <h6>.
Syntax:
- <h1>Main Heading</h1>
- <h2>Subheading 1</h2>
- <h3>Sub-subheading 1.1</h3>
- <h3>Sub-subheading 1.2</h3>
- <h2>Subheading 2</h2>
44. <h1> to <h6>:
With the help of this tag, we can define the web page’s heading. It also makes the heading as large and bold by default. the <h1> headings are displayed in the largest font, whereas the <h6> headings are displayed in the smallest font.
Syntax:
- <h1>Heading level 1</h1>
- <h2>Heading level 2</h2>
- <h3>Heading level 3</h3>
- <h4>Heading level 4</h4>
- <h5>Heading level 5</h5>
- <h6>Heading level 6</h6>
45. <hr>:
With the help of this tag, we can divide the web page. It stands for horizontal rule or theme break.
Syntax:
- <hr>
46. <html>:
With the help of this tag, all other elements are contained by it. It is also known as the root of the HTML element.
Syntax:
- <!DOCTYPE html>
- <html>
- <!– HTML content goes here –>
- </html>
47. <i>:
With the help of this tag, we can make any content italicized. It Highlights an important term, phrase, or technical term.
Syntax:
- <i>Italicized Text</i>
48. <iframe>:
With the help of this tag, we can embed another HTML page into the current webpage.
Syntax:
- <iframe src=“url”></iframe>
49. <img>:
With the help of this tag, we can embed an image into the current web page. It links an image to the image without directly inserting it into the web page.
Syntax:
- <img src=“image-url” alt=“alternative-text”>
50. <input>
With the help of this tag, we can enable interactive control in the form. It also depends on the various fields of the attribute type.
Syntax:
- <input type=“input-type” name=“input-name” value=“default-value”>
51. <ins>:
With the help of this tag, we can specify the block of the inserted text. It also signifies that a particular range of text has been added to the document.
Syntax:
- <ins>Inserted Text</ins>
52. <kbd>:
With the help of this tag, we can refer to the textual part of the inline text that represents the user’s keyboard, voice, or any other text input device.
Syntax:
- <kbd>Keyboard Input</kbd>
53. <label>:
With the help of this tag, we can improve the usability for mouse users, i.e., clicking on the label will toggle the control.
Syntax:
- <label for=“input-id”>Label Text</label>
54. <legend>:
With the help of this tag, we can define the title for the child’s content. Legends are the parent element of all the child elements. We can define these elements with the help of <fieldset>.
Syntax:
- <fieldset>
- <legend>Fieldset Caption</legend>
- <!– Form controls go here –>
- </fieldset>
55. <li>:
With the help of this tag, we can represent the list of items on the web page. It contains an ordered list (an unordered or a menu) as a parent element.
Syntax:
- <ul>
- <li>List Item 1</li>
- <li>List Item 2</li>
- <li>List Item 3</li>
- </ul>
56. <link>:
With the help of this tag, we can link external resources to the current webpage.
Syntax:
- <link rel=“stylesheet” href=“stylesheet.css”>
57. <main>:
With the help of this tag, we can make an ordinary element the most important element. We have to write this tag inside the <body> tag.
Syntax:
- <main>
- <!– Main content goes here –>
- </main>
58. <map>:
With the help of this tag, we can define the map image. The image map also has a clickable area.
Syntax:
- <map name=“map-name”>
- <!– Area tags go here –>
- </map>
59. <mark>:
With the help of this tag, we can represent the text as highlighted, which will be used for reference or notation purposes. Based on the importance of the content, it highlighted the text.
Syntax:
- <mark>Highlighted Text</mark>
60. <meta>:
With the help of this tag, we can represent the document’s metadata. The metadata contains page description, keywords, copyright, the language used, and the author.
Syntax:
- <meta name=“metadata-name” content=“metadata-value”>
61. <meter>:
With the help of this tag, we can represent the Measurements within a given range or fractional values. It is also known as the gauge.
Syntax:
- <meter value=“current-value” min=“minimum-value” max=“maximum-value”>Fallback Content</meter>
62. <nav>:
With the help of this tag, we can represent the section of navigational links in a document. Some examples of nav tags are Menus, tables of contents, indexes, etc.
Syntax:
- <nav>
- <!– Navigation links or menus go here –>
- </nav>
63. <noscript>:
With the help of this, we can provide an alternative script when the user’s browser does not support the particular script. It also works whenever the user’s browser does not support client-side scripting or does not support any scripting language.
Syntax:
- <noscript>
- <!– Alternate content goes here –>
- </noscript>
64. <object>:
With the help of this tag, we can display multimedia like audio, videos, images, PDFs, and Flash on web pages.
Syntax:
- <object data=“resource-url”></object>
65. <ol>:
This tag is used for the creation of the ordered list. The ordered list can be numerical or alphabetical. Inside the <ol> tag, we can create the list using the <li> tag. It will then follow the order.
Syntax:
- <ol>
- <li>First Item</li>
- <li>Second Item</li>
- <li>Third Item</li>
- </ol>
66. <optgroup>:
This tag is used in the creation of the drop-down list. With the help of this tag, we can define the group of options.
Syntax:
- <select>
- <optgroup label=“Group Label”>
- <option value=“option1”>Option 1</option>
- <option value=“option2”>Option 2</option>
- <!– Additional options –>
- </optgroup>
- <!– Additional outgroup or option elements –>
- </select>
67. <option>:
With the help of this tag, we can define the option in the drop-down list by using the <select> tag.
Syntax:
- <select>
- <option value=“option-value”>Option Text</option>
- <!– Additional options –>
- </select>
68. <output>:
With the help of this tag, we can create the container for the element that injects the result of the calculation.
Syntax:
- <output for=“input-id”></output>
69. :
With the help of this tag, we can define the paragraph tag. With the help of a paragraph tag, we can represent the visual media as blocks of text separated from adjacent blocks by blank lines or first-line indentation.
Syntax:
- Paragraph text goes here.
70. <param>:
With the help of this tag, we can define the parameter for an object. With the help of this, we can pass the parameter for another embedded object.
Syntax:
- <object>
- <param name=“param-name” value=“param-value”>
- </object>
71. <picture>:
With the help of this tag, we can provide flexibility to the web page by specifying the image. It also contains tags like <source> and <img>.
Syntax:
- <picture>
- <source srcset=“image1.jpg” media=“media-query”>
- <source srcset=“image2.jpg” media=“media-query”>
- <img src=“fallback-image.jpg” alt=“Fallback Image”>
- </picture>
72. <pre>:
With the help of this tag, we can declare the block of pre-formatted text on the web page the pre-formatted character, such as spaces, line breaks, tabs, etc.
Syntax:
- <pre>
- The pre-formatted text goes here.
- </pre>
73. <progress>:
With the help of this tag, we can display the progression of the task. With the help of this, the developer can create a progress bar on their web page.
Syntax:
- <progress value=“current-value” max=“maximum-value”></progress>
74. <q>:
With the help of this tag, we can create an inline quotation on the web page. The text is contained inside the quotation marks in most browsers today.
Syntax:
- Here is a <q>short quotation</q> within a sentence.
75. <rp>:
With the help of this tag, we can use it in the fallback parenthesis when a browser does not support ruby annotations.
Syntax:
- <ruby>
- Base text <rp>(</rp><rt>Ruby text</rt><rp>)</rp>
- </ruby>
76. <rt>:
With the help of this tag, we can define the pronunciation of the character inside the ruby annotation.
Syntax:
- <ruby>
- Base text <rt>Ruby text</rt>
- </ruby>
77. <ruby>:
With the help of this, we can define the East Asian characters’ pronunciations and represent small annotations above, below, or next to the base text.
Syntax:
- <ruby>
- Base text <rt>Ruby text</rt>
- </ruby>
78. <s>:
With the help of this tag, we can render the text with a strikethrough or a line through it. We can use this tag when Things are no longer accurate or relevant.
Syntax:
- <s>Struck-through text</s>
79. <samp>:
With the help of this tag, we can define the sample output of the computer program. The content of this tag is displayed using a monospaced font in the browser.
Syntax:
- <samp>Sample text or code goes here</samp>
80. <script>:
With the help of this tag, we can insert the client-side scripting. It also enables the insertion of the script in the HTML web page.
Syntax:
- <script src=“script.js”></script>
81. <section>:
With the help of this tag, we can create the header and footer or any other section on the web page.
Syntax:
- <section>
- <!– Content goes here –>
- </section>
82. <select>:
With the help of this tag, we can define the list of options inside the list.
Syntax:
- <select>
- <option value=“option-value”>Option Text</option>
- <!– Additional options –>
- </select>
83. <small>:
With the help of this tag, we can reduce the font size by one size smaller than its base size, for instance, from large to small.
Syntax:
- <small>Small text goes here</small>
84. <source>
With the help of this tag, we can link multiple media resources like <audio> and <video>,
Syntax:
- <source src=“media-file.mp4” type=“video/mp4”>
85. <strong>
With the help of this tag, we can define the content as very important. The browser will display that element in bold.
Syntax:
- <strong>Emphasized text</strong>
86. <span>:
It is the most generic element in the HTML. We can apply the style by grouping the elements.
Syntax:
- <span>Text or content goes here</span>
87. <style>:
We can provide the style information for the document with the help of this tag.
Syntax:
- <style>
- CSS rules go here
- </style>
88. <sub>:
With the help of this tag, we can display the subscript element only for typographical reasons.
Syntax:
- <sub>Subscript text</sub>
89. <summary>:
With the help of this tag, we can create a box with the help of <details> element that contains the summary, caption, or legend. When we click on the summary button, it performs the open/closed state of the parent *details> element.
Syntax:
- <details>
- <summary>Summary text</summary>
- <!– Collapsible content goes here –>
- </details>
90. <sup>:
With the help of this tag, we can display any text as the superscript of the inline element.
Syntax:
- <sup>Superscript text</sup>
91. <svg>:
With the help of this tag, we can embed the SVG graphs into the web page. Also, we can define the vector graphics in an XML format with the help of this tag.
Syntax:
- <svg>
- <!– SVG content goes here –>
- </svg>
92. <table>:
With the help of this tag, we can define the data in a tabular format in HTML. It will create a two-dimensional table that has some rows and columns.
Syntax:
- <table>
- <!– Table content goes here –>
- </table>
93. <tbody>:
With the help of this tag, we can encapsulate the table’s rows associated with the table body.
Syntax:
- <table>
- <tbody>
- <!– Table rows go here –>
- </tbody>
- </table>
94. <td>:
With the help of this tag, we can define the table’s cell. A table row may consist of more than one <td> element. The default alignment is left in this element.
Syntax:
- <tr>
- <td>Table cell content</td>
- </tr>